
Setting up Printers: Difference between revisions
AlphaCubed (talk | contribs) No edit summary |
Add Ubuntu printing instructions |
||
| Line 79: | Line 79: | ||
Coming soon | Coming soon | ||
= Adding a Printer Given the Printer Hostname = | ==Ubuntu (And derivatives)== | ||
These instructions have been tested on Ubuntu 21.10 and there is a high likelihood they will work on older and newer versions. Please report any incompatibilities | |||
After you have completed these steps, adding other printers is a very easy process. You will be able to access the full print server list and add printers similar to Windows. | |||
# Edit the file <code>/etc/samba/smb.conf</code> in your favorite editor- <code>sudo nano /etc/samba/smb.conf</code> | |||
#Find the line <code>workgroup = [something]</code> and change it to <code>workgroup = rose-hulman.edu</code>. | |||
# Open Settings -> Printers. You should see a window with "No Printers" or any printers you have setup before. Click "Additional Printer Settings..." to access <code>system-config-printer</code> [[File:GNOME Settings Printer.png|frameless]] | |||
#Click "Add" in the top left to add a printer. The New Printer dialog will show, in the left-hand devices list, select Network Printer -> Windows Printer via SAMBA | |||
#In the "SMB Printer" box type <code>print.rose-hulman.edu/</code>. The trailing slash is necessary. Click the adjacent Browse... button and you should now be prompted to authenticate [[File:System-config-printer add printer dialog.png|frameless]] | |||
#Enter your Rose-Hulman network username, without domain, i.e. <code>nelsond1</code> in the Username box. Enter your Rose-Hulman network password in the Password box. Ensure that the Domain box is set to <code>rose-hulman.edu</code> and click OK. [[File:System-config-printer add printer samba credentials dialog.png|frameless]] | |||
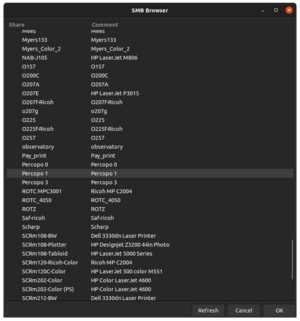
#The SMB browser will now open, allowing you to view every printer connected to the Rose-Hulman print server. For this example I will be adding the Percopo 1 printer. Select the printer you want to add and click OK. [[File:System-config-printer add printer samba list.png|frameless]] | |||
#You will be returned to the New Printer dialog. In the Authentication section, select "Set authentication details now." Enter your Rose-Hulman network username and password into the Username and Password fields (which are, oddly, in a non-standard order) and click the Forward button. Note that the Verify... button here doesn't work. | |||
#A search for a compatible driver will take place. If a driver is found, happy printing! You're done! But chances are you'll have to manually choose a driver. Continue to Step 10 if you get the Choose Driver dialog. | |||
#You will be prompted to select a driver. I'll copy the driver instructions from above: | |||
##For HP printers, this should be easy -- find your make and model in the database. You must have hplip -- it is pre-installed with the latest Ubuntu releases. If you aren't seeing the printer in the database, try to omit some words from your search. For example, if the model name is HP LaserJet Enterprise M806, try to look for a HP LaserJet M806. | |||
## For Ricoh printers, ignore the model number. Select Printer from Database -> scroll down under Makes and click "Ricoh" > click "Ricoh PDF Printer [en] (recommended)". | |||
##For other printers, <s>good luck.</s> Take a look at the manufacturer's website. They may have a PPD file available, or a Linux driver that you can install. | |||
To add more printers, just follow steps 3-10 again. | |||
=Adding a Printer Given the Printer Hostname= | |||
These tutorials assume you have cups already installed on your system. | These tutorials assume you have cups already installed on your system. | ||
'''You need to have a printer hostname already figured out. If not, look at the tutorial above.''' | '''You need to have a printer hostname already figured out. If not, look at the tutorial above.''' | ||
== Via the command line == | ==Via the command line== | ||
You need to have the <code>system-config-printer</code> package already installed on your Linux system. | You need to have the <code>system-config-printer</code> package already installed on your Linux system. | ||
| Line 117: | Line 137: | ||
Now you can print from any application as normal. | Now you can print from any application as normal. | ||
== KDE == | ==KDE== | ||
Click on the Application Launcher in the bottom-left panel. Type "system settings" and click on the "System Settings" item. You can also go to the "Computer" tab > System Settings. | Click on the Application Launcher in the bottom-left panel. Type "system settings" and click on the "System Settings" item. You can also go to the "Computer" tab > System Settings. | ||
| Line 133: | Line 153: | ||
Click "Next". You can give a name and description to the printer if you want to, or disable sharing. Click "Finish" to finish setup. You can print a test page by clicking on the printer name > "Maintenance" > "Print Test Page" to see if the configuration works properly. | Click "Next". You can give a name and description to the printer if you want to, or disable sharing. Click "Finish" to finish setup. You can print a test page by clicking on the printer name > "Maintenance" > "Print Test Page" to see if the configuration works properly. | ||
= Troubleshooting = | =Troubleshooting = | ||
== Can't print == | ==Can't print== | ||
Make sure cups is enabled in a terminal: <code>sudo systemctl status cups</code>. If it says it's disabled or stopped, try typing: <code>sudo systemctl enable cups && sudo systemctl start cups</code> | Make sure cups is enabled in a terminal: <code>sudo systemctl status cups</code>. If it says it's disabled or stopped, try typing: <code>sudo systemctl enable cups && sudo systemctl start cups</code> | ||
== Paper looks weird == | == Paper looks weird== | ||
Make sure you have selected Letter paper and not A4 paper in your printer settings and make that the default. That will make the page margins appear less "airy" on real paper. Sometimes Linux defaults to A4 when setting up a printer for the first time. | Make sure you have selected Letter paper and not A4 paper in your printer settings and make that the default. That will make the page margins appear less "airy" on real paper. Sometimes Linux defaults to A4 when setting up a printer for the first time. | ||
Revision as of 00:27, 8 December 2021
You can easily set up a printer on Rose-Hulman's campus by finding it's hostname. To find a list of some of the hostnames you can go to the url here and scrolling down to the table of printers. Other hostnames can be found by logging into the \\print network via SAMBA. You need to be connected to the eduroam Wi-Fi network to print.
You will need the cups package to interface with printers, or similar. On campus, all of the printers are HP printers. You should install the hplip driver as a package on your system.
To check this, in Ubuntu/Debian-based distributions with the apt package manager, type sudo apt-get install cups. This will install cups on your system.
In Arch Linux based distributions (Manjaro, EndeavourOS, Parabola, etc.), type sudo pacman -S cups.
Similarly, with hplip, do the same thing, except replace "cups" with "hplip" in both examples.
Viewing All Printers
You must be logged into the eduroam network.
These tutorials assume you have cups already installed on your system.
KDE (probably works on GNOME as well)
Updated as of 9/23/2021.
WARNING: System Settings will not work if you don't know the printer's hostname. This is because the "Browse" button when adding a printer via SAMBA is apparently grayed out.
We will use system-config-printer instead, and it's been overall more reliable for me.
Tutorial:
You need to have the system-config-printer package already installed on your Linux system.
Go to the terminal and run the command
system-config-printer
A GUI will pop up. Click the "Unlock" button.
This will prompt you for your password which you should type then press ENTER.
Click on "Add Printer".
Scroll down to "Other Network Printers" > "Windows Printer via SAMBA".
Finding a Printer
Do the following:
- Make the text box after
smb://showprint/ - Click "Browse" next to it
- A login dialog should pop up. It says "you must log in to access print".
- Enter your Rose email in the username box, which should be
[NETWORKUSERNAME]@rose-hulman.edu - Leave the Domain as WORKGROUP. Do not change it.
- Enter your Rose network password.
- Click OK.
- Click on a printer in the "SMB Browser" window. This is very similar to the way you would do it in Windows.
- Note down the "Name" which contains the hostname (e.g. hmu100-ricoh) and the "Comment" which contains the model of the printer. You will need it when searching for a driver.
- For example, to print on the printer in the Union, click "hmu100-ricoh" and click OK. (For future reference, the hostname is
socket://hmu100-ricoh.printer.rose-hulman.edu, orsocket://[name on the left].printer.rose-hulman.edu, should you follow the below tutorial.)
Driver Selection
- Now, in the other window, where you actually add the printer, instead of using SAMBA, click on "Manual URI" and type in the printer hostname which is
socket://[name on the left that you wrote down].printer.rose-hulman.edu - In the other window, leave the radio box as "Prompt user if authentication is required" and click Forward.
- Select your driver.
- For HP printers, this should be easy -- find your make and model. You do need to install hplip though (see at the top for instructions)
- For Ricoh printers, ignore the model number. Select Printer from Database > scroll down under Makes and click "Ricoh" > click "Ricoh PDF Printer [en] (recommended)".
- Other printers: TBD, just find a driver that works.
- Click Forward.
- You can name your printer and give it a description which will only be stored locally. I called the Union one "HMU100", for example, and left the description as-is.
- Click Apply and enter your password.
- Do not print a test page unless you need it. This wastes paper. (Click "Cancel" in the dialog to do so.) Instead, I recommend you test a real document. If the document is confidential, print a test page first so you know this is the right printer.
Set your printer in the print settings, make sure it's letter (not A4 paper), and print away!
Doesn't work?
Make sure you've entered the socket://[name on the left].printer.rose-hulman.edu URL and chose "Manual URI".
Go to printer queue (e.g. on the tray in KDE -> printer icon, click on it) > click on the right printer > "Active Jobs" > right click a job > Authenticate. Enter your rose username without @rose-hulman.edu this time, and your password, then click OK. Wait a few seconds, click "Completed jobs", and it should print.
Via the command line
Coming soon
Ubuntu (And derivatives)
These instructions have been tested on Ubuntu 21.10 and there is a high likelihood they will work on older and newer versions. Please report any incompatibilities
After you have completed these steps, adding other printers is a very easy process. You will be able to access the full print server list and add printers similar to Windows.
- Edit the file
/etc/samba/smb.confin your favorite editor-sudo nano /etc/samba/smb.conf - Find the line
workgroup = [something]and change it toworkgroup = rose-hulman.edu. - Open Settings -> Printers. You should see a window with "No Printers" or any printers you have setup before. Click "Additional Printer Settings..." to access
system-config-printer
- Click "Add" in the top left to add a printer. The New Printer dialog will show, in the left-hand devices list, select Network Printer -> Windows Printer via SAMBA
- In the "SMB Printer" box type
print.rose-hulman.edu/. The trailing slash is necessary. Click the adjacent Browse... button and you should now be prompted to authenticate
- Enter your Rose-Hulman network username, without domain, i.e.
nelsond1in the Username box. Enter your Rose-Hulman network password in the Password box. Ensure that the Domain box is set torose-hulman.eduand click OK.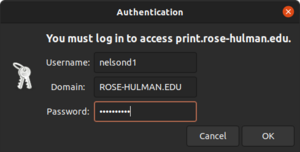
- The SMB browser will now open, allowing you to view every printer connected to the Rose-Hulman print server. For this example I will be adding the Percopo 1 printer. Select the printer you want to add and click OK.
- You will be returned to the New Printer dialog. In the Authentication section, select "Set authentication details now." Enter your Rose-Hulman network username and password into the Username and Password fields (which are, oddly, in a non-standard order) and click the Forward button. Note that the Verify... button here doesn't work.
- A search for a compatible driver will take place. If a driver is found, happy printing! You're done! But chances are you'll have to manually choose a driver. Continue to Step 10 if you get the Choose Driver dialog.
- You will be prompted to select a driver. I'll copy the driver instructions from above:
- For HP printers, this should be easy -- find your make and model in the database. You must have hplip -- it is pre-installed with the latest Ubuntu releases. If you aren't seeing the printer in the database, try to omit some words from your search. For example, if the model name is HP LaserJet Enterprise M806, try to look for a HP LaserJet M806.
- For Ricoh printers, ignore the model number. Select Printer from Database -> scroll down under Makes and click "Ricoh" > click "Ricoh PDF Printer [en] (recommended)".
- For other printers,
good luck.Take a look at the manufacturer's website. They may have a PPD file available, or a Linux driver that you can install.


To add more printers, just follow steps 3-10 again.
Adding a Printer Given the Printer Hostname
These tutorials assume you have cups already installed on your system.
You need to have a printer hostname already figured out. If not, look at the tutorial above.
Via the command line
You need to have the system-config-printer package already installed on your Linux system.
To add a printer, go to the terminal and run the command
sudo system-config-printer
This will prompt you for your password which you should type then press enter.
It will bring up a printer menu that shows all available printers. To add a printer, click the + Add button in the upper left hand corner.
The default option will be to add a printer by the URI which is basically a link to the printer. The URI will be something like this:
socket://PRINTER_HOSTNAME.printer.rose-hulman.edu
Most printer hostnames can be found on Rose-Hulman's EIT knowledgebase. Pick the location you want to print from.
For example, for Olin-257, the hostname is "o257-ps" meaning the URI would be socket://o257-ps.printer.rose-hulman.edu .
So type that value into the uri field and press "Forward".
Next you have to pick the printer driver. All printers on Rose-Hulman's campus are HP so pick HP and press "Forward".
Next pick the model for the printer. This information can also be found in the link where hostnames are found. The 9040dn is under the driver name "LaserJet 9040dn".
When you find the appropriate driver, press "Forward". This will bring you to the Installable Options. The defaults are usually fine so press "Forward" again.
Next you can give the printer a Printer Name, Description, and Location. These values are just to make it easy to remember which printer is which. Choose values and press "apply"
Now in the menu you should see the printer was added. You can right click on the printer, choose "Properties" and then press "Print Test Page" to print a test page. This will verify if the printer is correctly configured.
Now you can print from any application as normal.
KDE
Click on the Application Launcher in the bottom-left panel. Type "system settings" and click on the "System Settings" item. You can also go to the "Computer" tab > System Settings.
In KDE Plasma 5.11 and newer, the settings are arranged on the left panel. In older KDE Plasma versions, the settings are arranged in a grid.
In either case, scroll down to Hardware section > Printers. Click on "Add Printer". A "Select a Printer to Add" dialog box should come up. Click on "Manual URI" and type in the printer hostname.
Most printer hostnames can be found on Rose-Hulman's EIT knowledgebase. Pick the location you want to print from.
For example, for Olin-257, the hostname is "o257-ps" meaning the URI would be socket://o257-ps.printer.rose-hulman.edu . Type that into the "Connection" box.
Click "Next". In "Pick a Driver", click on the driver matching the printer model and name. See the EIT knowledgebase link above for details. If there are multiple drivers, you should choose the (recommended) version, and (en) version if it is listed. If you see "requires proprietary plugin" in one of the listings, you can install that driver, unless you prefer not to install it.
Click "Next". You can give a name and description to the printer if you want to, or disable sharing. Click "Finish" to finish setup. You can print a test page by clicking on the printer name > "Maintenance" > "Print Test Page" to see if the configuration works properly.
Troubleshooting
Can't print
Make sure cups is enabled in a terminal: sudo systemctl status cups. If it says it's disabled or stopped, try typing: sudo systemctl enable cups && sudo systemctl start cups
Paper looks weird
Make sure you have selected Letter paper and not A4 paper in your printer settings and make that the default. That will make the page margins appear less "airy" on real paper. Sometimes Linux defaults to A4 when setting up a printer for the first time.