Setting up Printers: Difference between revisions
AlphaCubed (talk | contribs) m Fix broken EIT URL |
Added ArchWiki page for Samba |
||
| (19 intermediate revisions by 5 users not shown) | |||
| Line 1: | Line 1: | ||
You can easily | You can easily print '''on Rose-Hulman's campus''' using Papercut. '''You need to be connected to the eduroam Wi-Fi network to print.''' | ||
You will need the <code>cups</code> | You will need the <code>cups</code>, <code>samba</code> and <code>system-config-printer</code> packages. | ||
To check this, in Ubuntu/Debian-based distributions with the apt package manager, type <code>sudo apt-get install cups</code>. This will install | To check this, in Ubuntu/Debian-based distributions with the apt package manager, type <code>sudo apt-get install cups samba system-config-printer</code>. This will install the required dependencies on your system. | ||
In Arch Linux based distributions (Manjaro, | In Arch Linux based distributions (Manjaro, EndeavourOS, Parabola, etc.), type <code>sudo pacman -S cups samba</code>. For Arch you will also need to configure samba. The [https://git.samba.org/samba.git/?p=samba.git;a=blob_plain;f=examples/smb.conf.default;hb=HEAD default configuration] should be fine. More directions for installing the default configuration are available on the [https://wiki.archlinux.org/title/Samba Samba ArchWiki] page under section 1.1 - Installation. | ||
= Initial Setup = | |||
You must be logged into the eduroam network. These tutorials assume you have cups already installed on your system. When you setup printers on your laptop, there are two available print queues. One is for black and white printing and one for printing to the library. You only need to add these two to your system and you should be able to use any printer on campus by scanning that printer's QR code to release the job. The hostnames for the queues are: | |||
{| class="wikitable" | |||
|+ | |||
!Name | |||
!URL | |||
!Printers | |||
|- | |||
|Color Print Queue | |||
|print.rose-hulman.edu/RHIT%20Library%20Color%20Printing | |||
|Library Color Printer | |||
|- | |||
|Black & White Print Queue | |||
|print.rose-hulman.edu/RHIT%20BW%20Printing | |||
|All other campus printers | |||
|} | |||
= | ==Via <code>system-config-printer</code>== | ||
Using the terminal, run <code>system-config-printer</code> | |||
Click the unlock button in the top right corner and input your password in the popup. | |||
Click Add | |||
In the new window, expand Network Printer and choose Windows Printer via SAMBA | |||
In the address box enter ether the Color or Black & White URL | |||
Select Set authentication details now and add your Rose-Hulman password and set the username as <code>rose-hulman.edu\[your user name]</code> | |||
Do not click the Verify button, it will always report a failure even if everything is correct | |||
[[File:2025 printer network settings.png|none|thumb|479x479px|printer setup network settings]] | |||
Click Forward | |||
Leave the driver selection on Generic | |||
[[File:Driver selection 1.png|alt=driver selection page 1|none|thumb|478x478px|driver selection page 1]] | |||
Click Forward | |||
Select PostScript from the left box | |||
[[File:Driver selection 2.png|alt=page 2 of driver selection|none|thumb|479x479px|page 2 of driver selection]] | |||
Click Forward | |||
Check the Duplexer box | |||
Click Forward | |||
Give the printer a name such as BWprinting | |||
[[File:Printer naming.png|alt=page for naming the printer|none|thumb|478x478px|page for naming the printer]] | |||
Click apply | |||
Choose yes to printing a test page | |||
The page should report as printing successfully | |||
Click on on the Printer Properties window | |||
Go to https://print.rose-hulman.edu:9192/ | |||
Login with your rose username and password | |||
select "Jobs Pending Release" from the menu on the left | |||
You should see (Test Page) in the print que | |||
[[File:Papercut showing test page.png|none|thumb|643x643px|papercut showing test page in queue]] | |||
Cancel the print job | |||
If the print job exists you can now print from any application to the newly added printer and then use Papercut to print it from any of the printers on campus | |||
=Troubleshooting = | |||
== Rose-Hulman provided resources == | |||
[https://rose-hulman.microsoftcrmportals.com/knowledgebase/article/KA-01361/en-us How to print from Ubuntu] | |||
[https://rose-hulman.microsoftcrmportals.com/knowledgebase/article/KA-01362/en-us How to print from a Mac] | |||
[https://rose-hulman.microsoftcrmportals.com/knowledgebase/article/KA-01154/en-us How to print from a personal Windows device] | |||
[https://rose-hulman.microsoftcrmportals.com/knowledgebase/article/KA-01358/en-us How to print from your provided Thinkpad] | |||
==Can't print== | |||
Make sure cups is enabled in a terminal: <code>sudo systemctl status cups</code>. If it says it's disabled or stopped, try typing: <code>sudo systemctl enable cups && sudo systemctl start cups</code> | |||
== Paper looks weird== | |||
Make sure you have selected Letter paper and not A4 paper in your printer settings and make that the default. That will make the page margins appear less "airy" on real paper. Sometimes Linux defaults to A4 when setting up a printer for the first time. | |||
Latest revision as of 21:11, 29 October 2025
You can easily print on Rose-Hulman's campus using Papercut. You need to be connected to the eduroam Wi-Fi network to print.
You will need the cups, samba and system-config-printer packages.
To check this, in Ubuntu/Debian-based distributions with the apt package manager, type sudo apt-get install cups samba system-config-printer. This will install the required dependencies on your system.
In Arch Linux based distributions (Manjaro, EndeavourOS, Parabola, etc.), type sudo pacman -S cups samba. For Arch you will also need to configure samba. The default configuration should be fine. More directions for installing the default configuration are available on the Samba ArchWiki page under section 1.1 - Installation.
Initial Setup[edit | edit source]
You must be logged into the eduroam network. These tutorials assume you have cups already installed on your system. When you setup printers on your laptop, there are two available print queues. One is for black and white printing and one for printing to the library. You only need to add these two to your system and you should be able to use any printer on campus by scanning that printer's QR code to release the job. The hostnames for the queues are:
| Name | URL | Printers |
|---|---|---|
| Color Print Queue | print.rose-hulman.edu/RHIT%20Library%20Color%20Printing | Library Color Printer |
| Black & White Print Queue | print.rose-hulman.edu/RHIT%20BW%20Printing | All other campus printers |
Via system-config-printer[edit | edit source]
Using the terminal, run system-config-printer
Click the unlock button in the top right corner and input your password in the popup.
Click Add
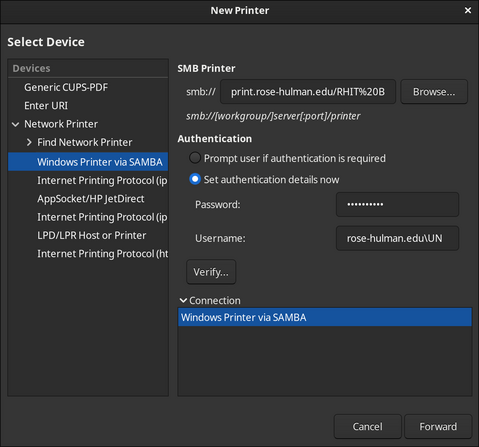
In the new window, expand Network Printer and choose Windows Printer via SAMBA
In the address box enter ether the Color or Black & White URL
Select Set authentication details now and add your Rose-Hulman password and set the username as rose-hulman.edu\[your user name]
Do not click the Verify button, it will always report a failure even if everything is correct
Click Forward
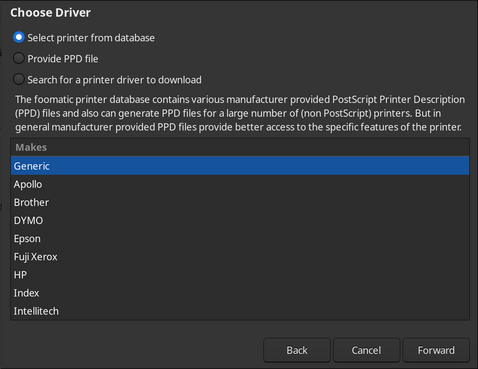
Leave the driver selection on Generic
Click Forward
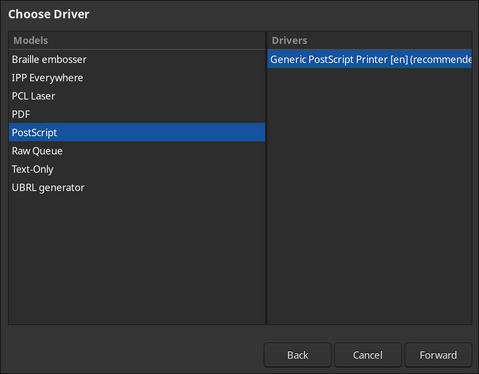
Select PostScript from the left box
Click Forward
Check the Duplexer box
Click Forward
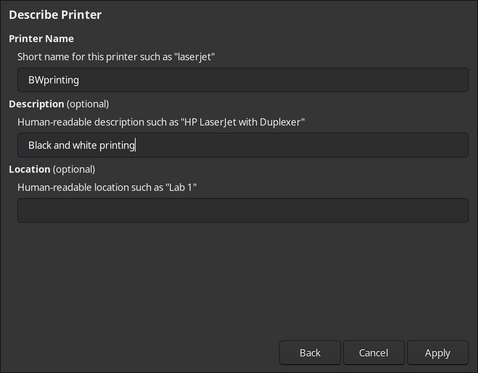
Give the printer a name such as BWprinting
Click apply
Choose yes to printing a test page
The page should report as printing successfully
Click on on the Printer Properties window
Go to https://print.rose-hulman.edu:9192/
Login with your rose username and password
select "Jobs Pending Release" from the menu on the left
You should see (Test Page) in the print que
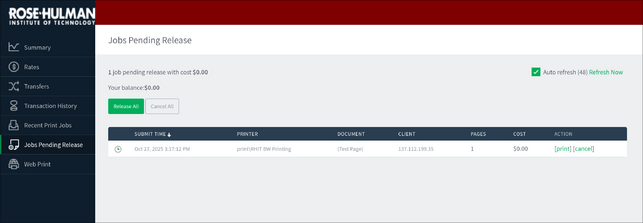
Cancel the print job
If the print job exists you can now print from any application to the newly added printer and then use Papercut to print it from any of the printers on campus
Troubleshooting[edit | edit source]
Rose-Hulman provided resources[edit | edit source]
How to print from a personal Windows device
How to print from your provided Thinkpad
Can't print[edit | edit source]
Make sure cups is enabled in a terminal: sudo systemctl status cups. If it says it's disabled or stopped, try typing: sudo systemctl enable cups && sudo systemctl start cups
Paper looks weird[edit | edit source]
Make sure you have selected Letter paper and not A4 paper in your printer settings and make that the default. That will make the page margins appear less "airy" on real paper. Sometimes Linux defaults to A4 when setting up a printer for the first time.